My (mostly) all-natural skin care regime for combination skin – tried and true!

 I’ve battled skin issues since I was 14. I spent years in high school, college and beyond punishing my skin with harsh chemicals and ravaging my insides with all kinds of antibiotics. The topical medications were effective for a while but they’d without fail eventually dry out my skin until I developed a different kind of skin issue. The pills my dermatologists were all too eager to prescribe also worked like magic, but knowing what I know now about gut health and the damaging effects of chronic antibiotic use I wish I could go back and pick a more natural path.

Better late than never.

For the last few years I’ve experimented with a variety of homemade, natural and gentle skin care treatments. Age is certainly on my side – my hormones have calmed down over the years – but my skin has never been better now that I treat it like I would treat any other vital organ in my body. Be kinder to your skin and if you can, skip the harsh chemicals and antibiotics. After years of trial and error here is what I’ve found that works for me….
img_6617
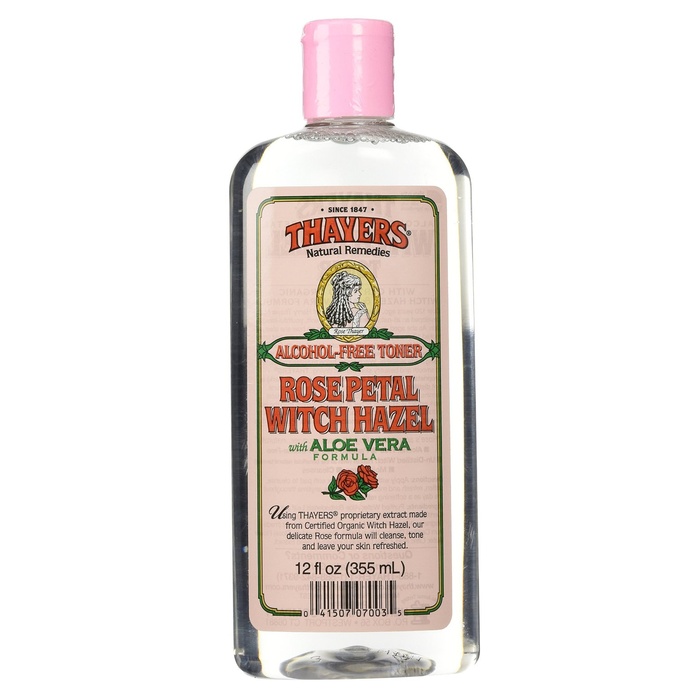
Every morning, I rinse with cold water to wake up and lightly pat my skin dry. After that, I use a homemade toner (1 part Thayer’s Rose Petal Witch Hazel with Aloe Vera: 1 part apple cider vinegar), followed by EltaMD UV Daily Tinted Broad-Spectrum SPF 40 moisturizer. The SPF component is key. I’ve used other brands that are “matte-ifying” and despite having oily-to-combination skin I think I look less greasy when I used the non-matte-ifying kind.
thayers-rose-petal-witch-hazel-with-aloe-vera
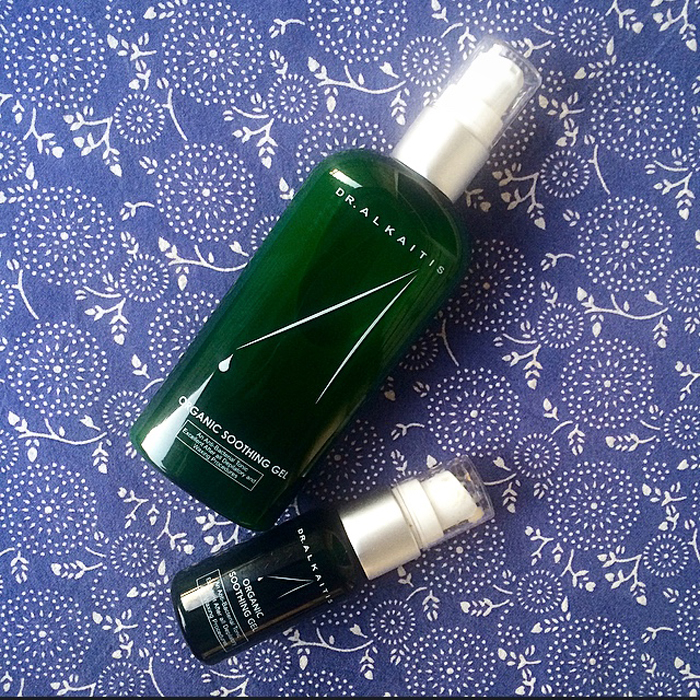
Every night, I wash my face with Herbivore Charcoal Bar Soap and dry it using a clean wash cloth, moving it around in small circles to gently exfoliate and lift off any residual moisturizer or makeup. I then layer on a thin coat of Dr. Alkaitis Organic Soothing Gel. I love how this feels on my skin – it’s like I can feel it tightening and toning! It’s not cheap but it lasts forever since you use so little each time. After that, I smother my face with a thick layer of Jason Aloe Vera Moisturizing Creme, which smells divine and is super affordable ($9 or less for 4 fluid ounces).
dr-alkaitis-soothing-gel
These rituals have worked for me on a daily basis for the last year and a half and haven’t shown any signs of losing their efficacy. As I get older, however, I realize it’s so important to give my skin a little more loving than this baseline alone, so three times a week I exfoliate using a homemade mix of coarse sea salt in honey and jojoba oil (1 part salt: 1 part honey: 2 parts jojoba oil).
img_7215
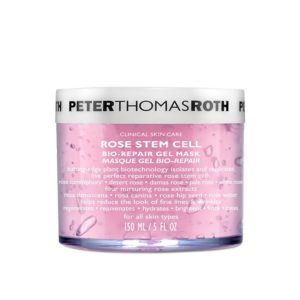
And once a week I use Peter Thomas Roth Rose Stem Cell Bio-Repair Gel Mask. I’m obsessed with this mask even though it is a little pricey by comparison to my other favorite products. I always feel like I’m glowing and dewey afterwards. Well worth it in my humble opinion!
peter_thomas_roth_rose_stem_cell_bio-repair_gel_mask_1_900x900
It’s a lot to invest in up front but these products stretch for a long time and your skin (and the environment) will thank you! It might take longer to see the results you desire but your skin will appreciate your patience.

Detox your Cleaning Cabinet: Top 5 Homemade Cleaners for a Healthier Home

Okay, so we’re a little past the point of spring cleaning but with last weekend’s summer solstice behind us perhaps we can call this an article dedicated to better-for-you-and-the-environment summer cleaning.

As a nutrition coach, I help guide dozens of people each year through my seasonal, whole foods detoxes. Cleaning up one’s diet is all well and good, but to truly detox we all ought to dive a little deeper into our daily habits and our cleaning closets/cabinets.

How many people out there use a countertop spray or bathroom cleaner loaded with ingredients you can’t pronounce?

I’m not here to shame you because I too have used these strange, chemical concoctions. I’m simply here to point out that, hey, if smart people like Mark Bittman recommend that we not eat anything with ingredients we can’t pronounce, why doesn’t that rule apply to the products we use daily on surfaces we eat off of and bathe in? Skin is a very porous organ, my friends! All of these products can easily seep into your system with repeated exposure whether you accidentally ingest trace amounts or simply absorb them from repeated contact.

Avoiding damaging chemical cleaning products is easier than you might think. In fact, you likely have most if not all the ingredients you need to clean and shine your pad right in your very own kitchen, pantry, and medicine cabinet.


Now that I really have your attention, here are my…


 Top 5 Homemade Cleaners for a Healthier Home


  1. All Purpose Cleaner
  • 1/2 cup white vinegar
  • 2 cups water
  • Juice of 2 lemons

Notes:

  • Fill a spray bottle with all ingredients. Shake well before dispensing.
  • Mist dirty surfaces evenly, then use a soft cloth or rag to wipe surfaces clean.
  • Don’t use on stone surfaces—i.e. granite or marble.


  1. Wood Polish
  • 1/2 cup olive or almond oil
  • Juice and peel of 1 lemon

Notes:

  • Combine ingredients at least one day in advance for optimal efficacy.
  • Apply to a soft dishtowel first, then gentle rub in circular motions across the intended surface.


  1. Bathroom Disinfectant
  • 1/2 cup white vinegar
  • 1/2 cup vodka or rubbing alcohol
  • 20 drops of tea tree oil
  • 10 drops of lemon oil

Notes:

  • Fill a spray bottle with all ingredients. Shake well before dispensing.
  • Mist dirty surfaces evenly, then use a soft cloth or rag to wipe surfaces clean.


  1. Glass Cleaner
  • 2 cups water
  • 2 Tbs white vinegar
  • 2 Tbs rubbing alcohol

Notes:

  • Fill a spray bottle with all ingredients. Shake well before dispensing.
  • Mist dirty surfaces evenly, then use a soft cloth or rag to wipe surfaces clean.


  1. Grout Scrub
  • 1 1/2 cups water
  • 1/2 cup baking soda
  • Juice of 2 lemons
  • 1/4 cup white vinegar

Notes:

  • Apply with a toothbrush and let sit for 5 minutes. Scrub vigorously to remove dirt and grime.
  • Wipe clean with a wet cloth and rinse with warm water.


Not only are all of these fumeless, non-toxic, and organic – they’re cheap and easy to make! Who doesn’t like cheap and easy?!

Peanut Butter Cashew Coconut Granola


Oh boy, it’s here! Another gluten-free granola recipe for you. All of my others have had very fall-like flavor profiles (pumpkin and sweet potato) but it’s time for spring y’all. Not that peanut butter and cashews exactly scream spring like asparagus and artichokes do, but they’re tasty year-round so just enjoy.

MOARfit by Amy Rizzotto Peanut Butter Granola

This yummy, crunchy, savory-sweet granola is great fuel  before a workout. Grab a small handful about 30-45 minutes prior to heading out the door. After a sweat session, top 3/4 cup low-fat plain greek yogurt with 1/4 cup granola and half an apple chopped for a well-balanced recovery meal. Add an extra dash of cinnamon for a more heart-healthy edge!

MOARfit by Amy Rizzotto Peanut Butter Granola


Peanut Butter Cashew Coconut Granola

What You’ll Need:

  • 5 cups gluten-free rolled oats
  • 1 cup raw cashew pieces
  • 1 cup unsweetened shaved coconut
  • 1/2 cup coconut oil (liquid or melted)
  • 3/4 cup all-natural peanut butter
  • 3/4 cup maple syrup or honey
  • 1 Tbs vanilla extract or 1 vanilla bean scraped
  • Optional: 1 cup chopped dried Turkish apricots

How to Make It:

  1. Preheat the oven to 300°F
  2. In a large bowl, mix together the oats, cashews, and coconut.
  3. In a blender, blend together the coconut oil, peanut butter, maple syrup, vanilla, and cinnamon until smooth.
  4. Pour blender mixture over your dry ingredients and stir until evenly coated.
  5. Spread the mixture on a lipped baking sheet, pressing it down to evenly cover all the way to the edges.
  6. Bake for 1 hour, gently turning the granola with a spatula every 15 minutes. Flip in sections so that you keep some clumps. Move some of the granola from the edges to the middle and from the middle to the edges about halfway through so that it cooks evenly.
  7. After an hour, turn the oven down to 275°F and cook another 10 -20 minutes. You’ll know it is done when it is dry to the touch and piece left to cool on the counter turns crispy. Remove from the oven and let it cool completely.
  8. If you’re adding dried apricots, stir them in while the mix is still cooling.

Note: store in an air-tight container for up to 2 weeks.


Curried Kabocha Squash and Celeriac Soup

March started out on an arctic foot. Freezing temperatures, icy sidewalks, and a wintry mix welcomed us to this transitory month where winter and spring face off creating job security for meteorologists and sidewalk umbrella vendors alike.

If you’re still in hibernation mode like me you’re going to love this warming soup recipe. It’s simple to make but layered with complex flavors that take it beyond your average creamy vegetable soup. It’s light enough to be an appetizer but works just as well as a main when paired with a hefty hunk of good sourdough bread and a side salad.

 MOARfit Kabocha and Celeriac Soup

Much of the subtle complexity of this soup comes from the star ingredient: kabocha squash. Kabocha squash is a type of Japanese squash with a sweet flavor akin to butternut squash, though it looks more like a small, green pumpkin. It has only 2/3 the calories of butternut squash per serving and is packed with beta-carotene which our bodies convert into Vitamin A and is essential for healthy white blood cells, a strong immune system, and good vision. Combined with antioxidant-rich curry leaves, which also deliver a rich, savory meets spicy meats sweet flavor, kabocha squash will help warm your body and keep seasonal sickness at bay.

MOARfit Kabocha Squash and Celeriac Root

Curried Kabocha Squash and Celeriac Soup

Ingredients:

  • 2 Tbs Olive Oil
  • 1 Yellow Onion, chopped
  • 2 Cloves of Garlic, thin slices
  • 2-3 Tbs Sherry Cooking Wine
  • 1/2 Celeriac Root (~1 1/2 cups), peeled and chopped
  • 1 Kabocha Squash (~2 1/2 cups), peeled and chopped
  • 1 1/2 – 2 Tbs Muchi Curry Powder
  • 1 Tbs Dried Oregano
  • Sea Salt and Pepper to taste
  • 4 Cups Chicken Stock
  • 1 Tbs Ghee (or Butter)
  • 1 Cup Low-Fat Milk

Directions:

  1. Heat a large saucepan over medium high heat. Add olive oil, turn down to medium and sauté onions and garlic until onions are translucent and garlic is fragrant but not burnt (approximately 5-7 minutes).
  2. Deglaze bottom of pan with sherry.
  3. Add chopped celeriac root and kabocha squash, curry, oregano, salt and pepper. Toss in onion garlic until evenly combined.
  4. Add chicken stock. Cover and bring to a boil. Reduce to a simmer until a fork easily pierces the squash and celeriac but they aren’t falling apart (approximately 15 minutes).
  5. Remove from heat. Add ghee and milk. Stir until combined.
  6. Using an emersion blender while still hot (or standing blender once slightly cooled) puree soup mixture until smooth.
  7. Taste for salt, spice, and acid balance. Add a little more salt and pepper, a hit of your favorite spice, or a touch more sherry if need be.
  8. Enjoy!

Note: If you want to make this vegan, simply exchange butter for coconut oil and cow’s milk for coconut milk.

Top it with an egg.

As a nutrition coach I’m often asked what are some of my go-to meals that are (A) healthy, and (B) quick. My response is almost always, yadda yadda yadda and “top it with an egg.” Ok, so I realize that’s not exactly helpful but it’s really that simple.  Pinky swear.

For example, one of my favorite dinners when I get home late from teaching at the studio is a small bowl of leftover roasted vegetables (think carrots, turnips, beets, sweet potatoes, onions, etc) topped with an over-easy egg; or, if I’m feeling fancy, a poached egg with some fresh herbs on top. The egg white serves as a filling protein and its yolk acts as an oozy, delicious sauce to richly coat the veggies and bring the dish together.

You can pretty much top any combination of raw or roasted vegetables, fresh or sautéed greens, herbs, homemade spreads, whole grains, and/or cheeses with an egg for a healthy, satisfying meal in under 10 minutes. Look in your fridge right now and give it a try. I dare you!

MOARfit Open Face Egg Sandwich on Sourdough

I put this theory to the test while down here in Florida for a little R&R with my itinerant roomie who is currently co-habitating with another grown male. Not surprisingly, their refrigerator looked like a bachelor’s when I first arrived. All that seemed edible was a carton of eggs and a half-used log of fresh goat cheese.

I thought to myself, I can work with this.

A quick trip to Publix and I was fully stocked thanks to their house-made jalapeno-cilantro hummus, some roasted red peppers, and a bag of baby arugula. I’d already brought down some of my homemade sourdough (thanks Caroline and Karen for the starter!) so I was good to go with just those few simple ingredients.

MOARfit Open Face Egg Sandwich on Sourdough

In no time, I was enjoying my simple sandwich in balmy 78 degree weather on their screen porch. It was a nice recovery meal after my morning run by Spacecoast Stadium and kept me full for my afternoon at the beach. Yes, I realize this is cruel torture for all my DC readers. Sending you sun and heat and love <3.


Amy’s Open-Faced Egg Sandwich on Sourdough


Ingredients:

  • 1 thick slice (good, hand-made) Sourdough Bread
  • 1 oz Goat Cheese
  • 2 Tbs Roasted Red Pepper Slices (enough to cover a piece of toast)
  • 1 small handful Arugula
  • 2 Tbs Hummus of choice
  • 1/2 tsp Organic Butter
  • 1 Egg
  • Sea Salt and Pepper to taste
  • 2 Tbs fresh Cilantro (optional)

Directions:

  1. Toast one thick slice of sourdough bread (or substitute any whole grain bread you like).
  2. While that’s toasting, heat a small frying pan over medium-high heat. Turn down to medium and add 1/2 tsp butter to pan. Crack an egg into the pan and cook until egg white turns opaque. Flip and cook another 1 minute. Remove from heat.
  3. White the egg is cooking, spread toast with a thin smear of goat cheese; layer on your roasted red pepper; pile arugula on top and don’t worry if it spills over; add two heaping spoonfuls of hummus and spread it around to the best of your abilities.
  4. Finally, la piece de resistance, top with an egg. Add a sprinkle of sea salt and freshly ground black pepper and even some fresh herbs if you’re feeling fancy!


Habanero Hot Sauce

WARNING: have tortilla chips and guacamole on hand – and maybe even a jug of milk (nut or seed milk for the dairy-impaired). This Habanero Hot Sauce is no joke. According to CNN, “habaneros generally score between 100,000 and 350,000 units on the Scoville scale, which measures chili pepper hotness.” For reference, jalepeno peppers usually score 2,500 to 5,000 units. Think I’m sensationalizing? These potent peppers were powerful enough to evacuate an elementary school back in April–I kid you not.

I don’t typically mess around with super spicy peppers because handling them can lead to uncomfortable side-effects (read: do not touch your eyes or other orifices after handling these until you’ve thoroughly washed your hands). In this MOARfit kitchen experiment, I found out the hard way that when you cut and cook habanero peppers, capsaicin particles are released into the air creating a hazy plume of prickly, eye watering vapor. Capsaicin is the active chemical compound in hot peppers that produces the burning sensation on our taste buds when we consume it–and as it turns out your eyes, nose and throat just from breathing.

Not for the faint of heart and certainly not for anyone who already doesn’t dig the way spicy foods make you feel, please take precautions if/when attempting to make your own Habanero Hot Sauce. Have the overhead vent going strong and a box of tissues on hand, and again, wash you hands very well when all is said and done. I might even recommend going so far as to use plastic gloves when handling these pint-size fireballs…

Habanero Hot Sauce | MOARfit by Amy Rizzotto

Habanero Hot Sauce

{makes approximately 20oz)

What You’ll Need:

  • 2 cups habanero peppers
  • 4 large cloves garlic
  • 1 large sweet white onion
  • 1 tsp sea salt
  • 1 tsp olive oil
  • 2 cups water
  • 1 cup distilled white vinegar
  • 1-2 Tbs arrowroot powder

How to Make It:

  1. De-stem, halve and seed habaneros. Believe me, you don’t need or want the seeds. Peel and crush garlic cloves. Peel and thinly slice onions.
  2. Combine peppers, garlic, onions, salt and oil in a non-stick saucepan over high heat. Cook for 3-5 min. Add water and continue to cook, stirring occasionally, for another 15-20 min, or until peppers are very soft and more than half the liquid has evaporated. (Note: this should be done in a very well-ventilated area!)
  3. Remove from heat and let sit until mixture comes to room temperature.
  4. In a food processor or blender, puree the mixture plus one cup of distilled white vinegar until smooth. Add arrowroot powder (or another thickener like corn starch or tapioca starch) to get your desired consistency.
  5. Taste and season with a little more salt if needed.
  6. Transfer to a sterilized pint jar or bottle and secure with an airtight lid. Refrigerate.

Let your hot sauce age for at least a week before using. Bottles and jars can be stored in the refrigerator for up to 6 months so don’t go burning off your taste buds before the new year.

Adapted from Emeril Lagasse’s Homemade Red Hot Sauce.

Curried Hummus

Washington, D.C. is bursting with countless fabulous tapas restaurants. The 14th street corridor alone hosts Barcelona, Estadio and Masa 14. While these places are all delicious and buzzing with energy, sometimes it’s nice to have the small plate experience–you know the kind where you can eat lots of different things and not feel stuffed–in your own home.

One of the easiest and healthiest tapas you can make is hummus. For me, hummus is never boring, but if a traditional blend is too bland for you my recommendation is to spice it up. I don’t just mean the spicy pepper, make-your-upper-lip-sweat kind of spice, I mean any spice(s) you love.

Topping my most loved list are, turmeric, cumin and curry–in no particular order. When I discovered the west Indian spice blend Muchi curry powder at Whole Foods, it was a game changer. Muchi is a spicier version of curry powder cut with a blend of turmeric, cardamon and other aromatic spices. I look for as many ways to use this spice combo as possible and my latest creation is this Curried Hummus.

Curried Hummus | MOARfit via www.moar-fit.com

Since you’re making this hummus from scratch there are no preservatives just whole, healthy, real foods. Garbanzo beans serve as the foundation, both in terms of consistency and nutrient density. Like all beans, garbanzo beans (aka chickpeas) are an excellent source of immune-boosting and figure-friendly dietary fiber.

And as long as you have a food processor, this recipe could not be easier. Just drop all ingredients inside, blender, scrape into an air-tight container and, voila, you have a healthy tapas or mid-afternoon snack (carrots not included) for up to a week when stored in the refrigerator.

Curried Hummus | MOARfit via www.moar-fit.com

Curried Hummus

{makes 8 servings}

what you’ll need.

  • 1 can garbanzo beans, rinsed and drained
  • 1 Tbs tahini
  • 1 Tbs Muchi Curry Powder (available at Whole Foods)
  • 1/2 tsp salt
  • 2 small cloves of garlic
  • Juice and zest of one lemon
  • 1/4 cup olive oil
  • 1 Tbs sherry vinegar

how to make it.

  1. Combine all ingredients in a food processor. Add a little water if it’s too thick for your liking.
  2. Enjoy! (yes, it’s that easy)

Originally published on The DC Ladies blog September 3, 2014.

How to Make Pickles

Everyone loves pickles. And if you are one of the few who don’t you’re really missing out. Pickles help fight disease (see below) and are shockingly easy to make. I don’t know why it took me so long to get on the homemade pickle bandwagon. Read on for how to make refrigerator pickles in a snap at home.

Homemade Pickles

Pickling has become all the rage these days, as has canning, but both of these fads are methods of food preservation that go way back. In fact, pickles played an important role in Colombus’s discovery of America in 1492. You may recall that scurvy, a disease caused by lack of vitamin C, used to be a mighty big problem for sailors. Luckily, Colombus’s ship stocker had plenty of vitamin C-rich pickles on board to help prevent scurvy outbreaks on the historic voyage across the Atlantic. How’s that for a fun pickle fact?

Homemade Pickles

There are hundreds of recipes you could follow, but here are some basic guidelines to get you started:

  • Use fresh produce, avoiding waxy produce found in many supermarkets.
  • Select the most uniform, unbruised produce for prettier pickles.
  • Scrub well and trim about 1/4 inch down from the blossom end of fresh cucumbers. Blossoms contain an enzyme that causes limp pickles–nobody likes a limp pickle.
  • Use salt with no additives. Iodized salt makes the brine cloudy and may change the color and texture of the vegetables.
  • Use white distilled or apple cider vinegars.
  • For crisper pickles, put the vegetables (whole or sliced) into a wide bowl and spread a layer of pickling salt on top. Cover and let sit overnight in a cool place. Discard the liquid, then rinse and dry the vegetables before pickling or canning as usual. This is the same idea behind prepping your eggplant before cooking.
  • For refridgerator pickles (like the ones in this post) wait at least 3 days before crunching. For canned pickles (using sterilized jars, a hot water bath, etc) wait at least 3 weeks before using to allow pickles to mellow.

Adapted from The Old Farmer’s Almanac.

Homemade Pickles


Refrigerator Dill Pickles

{Makes 2 pint jars}

What You’ll Need:

  • 1 1/2 lbs baby cucumbers (about 8-10 of the small guys)
  • 1 cup water
  • 1 cup apple cider vinegar
  • 1/4 cup lemon juice
  • 1 Tbs kosher or pickling salt
  • 2 tsp sugar
  • 1 fresh sprig of dill for each jar
  • 1 Tbs mustard seed, whole
  • 1 tsp ground turmeric
  • 1/2 tsp red pepper flakes
  • 4 cloves of garlic, smashed

Equipment:

  • Chefs knife
  • Cutting board
  • 2 wide-mouth pint jars with lids
  • Funnel
  • Large lidded pot

How to Make Them:

  1. Wash and dry the cucumbers. Trim away the blossom end of the cucumber, which contains enzymes that can lead to limp pickles. Leave the pickles whole, cut them into spears, or slice them into coins.
  2. Divide spices and herbs (dill, mustard seed, garlic, turmeric and red pepper flakes) evenly between both jars.
  3. Pack the pickles into the jars. Trim the ends if they stand more than 1/2 inch below the top of the jar. Pack them in as tightly as you can without smashing the cucumbers.
  4. Combine the vinegar, water, lemon juice, salt and sugar in a small sauce pan over high heat. Bring to a rolling boil. Pour the brine over the pickles, filling each jar until 1/2-inch from the top.
  5. Gently tap the jars against the counter to settle their contents and remove all air bubbles. Top off with more pickling brine if need be.
  6. Tightly close your jars with their lids.
  7. Wait at least one, but ideally 3 days before eating. Store in the refrigerator for up to 3 weeks.

For long-term storage, follow the hot water bath canning method.

Refrigerator Dill Pickles Label

Chicory Almond Milk Latte (Vegan & Caffeine-Free)

I recently did a 3-week cleanse, eliminating all gluten, dairy, added-sugar (including alcohol) and caffeine from my diet. In the end, caffeine (or the lack there of) seemed to make the biggest impact on my mental and physical sense of well-being. It’s not that I was drinking 5+ cups of coffee a day–in fact, I rarely had more than one–but as someone who is admittedly type A and stress-prone, the stimulant effect of caffeine was doing more harm than good.

Without caffeine I fall asleep faster, wake up feeling more rested and have far fewer spikes in anxiety throughout the day.

That being said, I’m someone who loves a latte from time to time and while decaf espresso is better than regular, it still contains caffeine. Everything in moderation, I still intend to have my decaf almond milk latte’s from Whole Foods every now and again, but on a more regular basis I’ve devised a delicious caffeine-free alternative loaded with superfoods.

Here are the highlights of three nutrient-dense ingredients in my caffeine-free, vegan latte:

Chicory Root:

  • detoxifying coffee-substitute
  • naturally caffeine-free
  • antimicrobial and antifungal properties
  • phenolic antioxidants  help reduce inflammation and prevent disease

The taste isn’t a dead ringer for coffee, but as someone who loves(/d) black coffee it comes pretty darn close.

Cinnamon

  • regulates blood sugar
  • reduces LDL cholesterol
  • anti-inflammatory properties which reduce cytokines linked to arthritic pain
  • reduces chronic inflammation linked with Alzheimer’s disease, Parkinson’s disease, multiple sclerosis, brain tumors and meningitis
  • alleviates menstrual pain
  • may be effective for infertility because it contains cinnamaldehyde, which studies show increases the hormone progesterone and decreases testosterone production in women

Coconut Oil

  • contains lauric acid (a medium chain triglyceride or MCT) which increases the good HDL cholesterol in the blood to help improve cholesterol ratio levels
  • rich in antioxidants, which helps boost immunity
  • when MCT breaks down helps liver break down fats and increase metabolism
  • may help regulate blood sugar and reduce abdominal fat

Chicory Almond Milk Latte

Vegan Caffeine-Free Latte

What You’ll Need:

{makes 2 servings}

  • 1 Tbs chicory root tea
  • 10-oz water
  • 8-oz unsweetened almond milk (see recipe for my Homemade Almond Milk below)
  • 2 medjool dates
  • 2 tsp coconut oil
  • 1/2 tsp cinnamon
  • 1/4 tsp each ground cloves, nutmeg, cardamon and white pepper

How to Make It:

  1. Steep 1 tablespoon of roasted chicory root tea in 10-oz of boiling water for 3-5 minutes.
  2. In a blender, add 8-oz unsweetened almond milk, 2 medjool dates (pits removed), 2 teaspoons of coconut oil and all the spices.
  3. Once tea is steeped, add tea to blender and blend on high for 1 minute until frothy.
  4. Serve in two coffee mugs with a dash of cinnamon or cocoa powder on top.

Note: if you like your lattes extra hot, give this a nuke in the microwave for 30-40 seconds or heat your almond milk on the stovetop in advance of putting it in the blender.

Homemade Almond Milk

What You’ll Need:

  • 1 cup raw almonds
  • 4 cups filtered water

How to Make It:

  1. Add almonds and water to blender and mix on high until smooth.
  2. Optional: strain liquid through cheese cloth to remove any pith.

Note: You can also add 1 tsp of vanilla extract to make it an unsweetened vanilla almond milk.

Saffron Fennel Bread

For the past 6 months, I have had a little golden packet of a special spice called saffron staring back at me from my kitchen cabinet. Saffron has a complex flavor that is often used in French bouillabaisse, Spanish paella, Milanese risotto, and many Middle Eastern dishes. I called it a “special” spice because not only is it quite pricey, but a little goes a long way when it comes to Saffron’s audacious effects on the palette.

image_1

Good news for all you natural remedy lovers out there! According to my girl Oprah, a 2008 study found that 76% of women who took daily saffron supplements reported a 50% drop in PMS symptoms like mood swings and fatigue (your welcome, in advance to the men in our lives). The spice has also been linked to the alleviation of mild to moderate depression. According to another study, saffron supplements were as effective as a common antidepressant in reducing symptoms related to depression.

This taste tantalizing and feel-good spice met its maker last weekend when I decided to dust off my dutch oven and get back to my bread baking roots. It all started because I realized I was in need of some bread to accompany two upcoming recipes–my meatless Monday Sweet Potato Bean Burgers with Maple Chipotle Mayo, and my slow-cooker Tuscan Lentil, Barley, and Kale Soup. Rather than running out to the store for a pre-made loaf, I got out my flours and yeast and got to cooking. I’ve been enjoying the bread for the last week and saved half in the freezer for when my schedule gets hectic with work travel. Give it a go and add a little something “special” to your sandwich or soup entree.

Saffrom Fennel Bread

What You’ll Need:

  • 1 1/4 cups warm water
  • 1 tbs active dry yeast (or one packet)
  • 1 tablespoon raw cane or coconut sugar
  • 2 cups unbleached, bread flour (plus a little more for kneading)
  • 1 cup whole wheat flour
  • 1/2 tbs kosher salt
  • 1 tbs whole fennel seeds
  • 1/8 tsp ground saffron
  • 1/4 cup cornmeal (for coating)

How to Make It:

  1. In a large bowl, mix water, yeast, and sugar. Add 1 cup of bread flour and stir until blended.  Wait 5 minutes.
  2. Once the mixture is slightly foamy, add salt, fennel seeds (crushing them lightly in your hand as you sprinkle them in), and saffron, and stir to blend. Add remaining cup of bread flour and all the whole wheat flour, little by little.  Mix the dough until it is too stiff to stir with a spoon.
  3. Place your dough on a lightly floured work surface and knead with your hands, adding additional bread flour when the dough gets too sticky. Knead until dough is smooth and consistent in texture, about 8-10 minutes.
  4. Place dough in a clean bowl, cover with plastic wrap, and let rise at room temperature until doubled in size (approx. 1 hour).
  5. Dust a baking sheet with cornmeal. Punch down the dough while still in its bowl, then form it into a firm ball and set on baking sheet. Cover with a dry cloth and let rise again until doubled in size (approx. 1 hour).
  6. About 40 minutes into the second hour, preheat the oven to 400°F with your dutch oven inside.
  7. 20 minutes after preheating, give your dough a good coating of cornmeal allover, then place it in the center of your (hot!) dutch oven. Bake bread covered for about 35 minutes, then uncovered for an additional 10 minutes or until golden brown. Set on a rack to cool for at least 20 minutes before slicing.