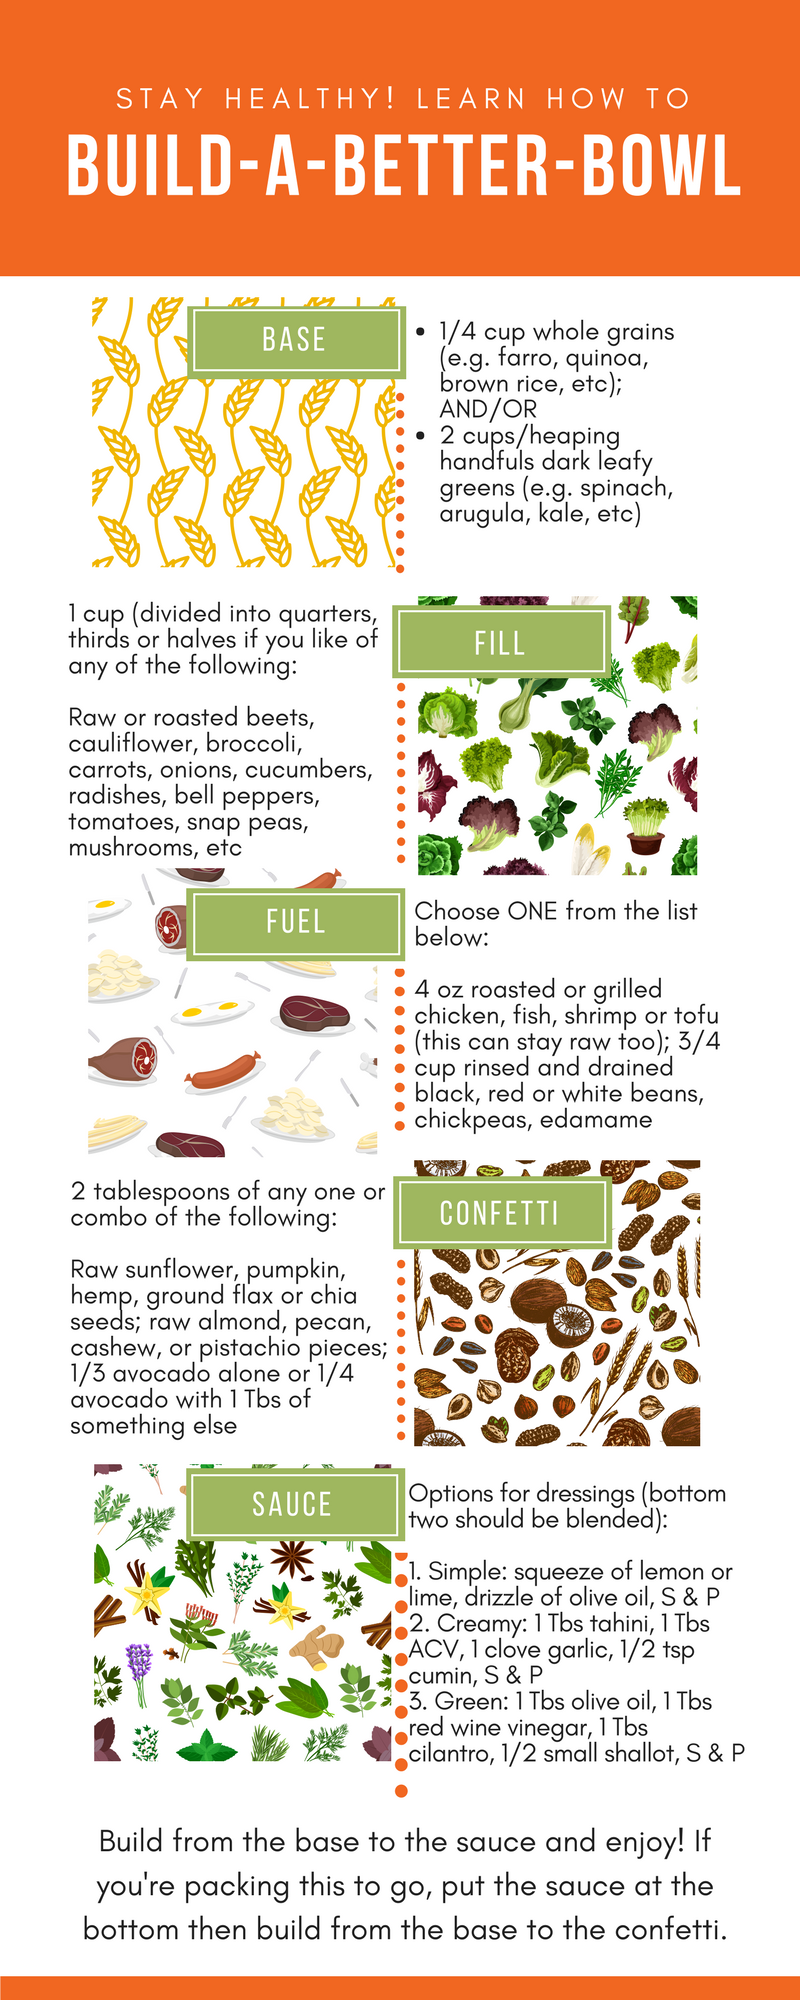
Fennel “Cream” Sauce with Blackened Tomatoes

This week’s recipe for a gluten-free, vegan pasta sauce features hearty, healthy fennel. Fennel is packed with dietary fiber, vitamin C, potassium and manganese, and provides a good amount of folate–a B-vitamin critical for proper function of your nervous system. When munched on raw, it has a light anise flavor that mellows out when cooked.

Fun fact #1: I learned from some family friends who grew up in Europe that the Swiss use raw fennel on veggie platters in place of celery.

Fun fact #2: fennel is one of the primary flavors in absinthe.

I adore the flavor of fennel, raw or not, and always have it on hand during the winter months for frittatas, stir-frys and snack time. What follows is my take on a vegan Fennel “Cream” Sauce. I paired it with gluten-free, quinoa pasta, blacked tomatoes (also included in the recipe) and cast-iron grilled chicken. If you’re aiming to keep this vegan, steer clear of the meat and opt for some cannellini beans instead.

Fennel “Cream” Sauce with Blackened TomatoesFennel "Cream" Sauce with Blackened Tomatoes

What You’ll Need –

For the Fennel “Cream” Sauce:

  • 1 tbs grapeseed oil
  • 1/2 fennel bulb,  plus 1/4 c fronds
  • 1/2 white onion
  • 2-3 cloves garlic
  • 2 tbs sherry or raspberry vinegar
  • Juice of one lemon
  • 1/4 c nutritional yeast
  • 1/4 c olive oil
  • 1/2 tsp turmeric
  • 1/4 tsp cayenne
  • Sea salt and ground pepper to taste

Directions:

  1. Heat grapeseed oil in a frying pan over medium-high heat. Add onions (coarsely chopped) and cook 1-2 min. Add fennel (coarsely chopped) and cook another 4-6 min. Once the onion and fennel have softened (the onions will appear translucent and both vegetables will start to brown around the edges), add your garlic–the cloves can remain whole as you’ll be blending this in a food processor–and cook another minute or so. You should start to see brown bits sticking to the bottom of your pan. So as to keep all that yummy flavor in your sauce, splash a couple tablespoons of sweet vinegar into your pan to deglaze. Give the mixture a stir and remove from heat.
  2. Add mixture to your food processor with the lemon, nutritional yeast. olive oil, turmeric, cayenne, and salt and pepper to taste. Pulse until it’s blended to your preferred sauce consistency.
  3. Pour over cooked, gluten-free pasta or go grain-free with a bowl of hearty winter vegetables or sauteed kale.

For the Blackened Tomatoes:

  • 1 tbs olive oil
  • 1 cup grape tomatoes
  • Sea salt

Directions:

  1. Pre-heat a cast-iron pan over medium-high heat (if you don’t have cast-iron opt for your heaviest frying pan).
  2. Cut tomatoes in half. On the rounded (uncut) side, make a small “X” cut. Drizzle “X” sides with olive oil and sprinkle with sea salt.
  3. Place the tomatoes “X” side down in your preheated pan and let them cook without turning.
  4. After about 2-3 minutes, peel up the edges and look for blackened skin with a little red showing through–and if you aren’t quite there yet, cook them a little longer.
  5. Remove from heat and add to your pasta and sauce mix.

To complete the meal:

  • 1 cup gluten-free pasta
  •  12 oz (or 3/4 lb) protein of choice (I went with free-range chicken)

Directions:

  1. Cook pasta according to package instructions. Drain and set aside.
  2. Fillet the chicken, coat it in some olive oil, salt and pepper (or your favorite marinade), and cook it in the same cast-iron pan (if you have one) as your tomatoes over medium-high heat for about 5 min per side.
  3. Combine pasta with sauce and blackened tomatoes, then top with slices of your chicken (3 oz per person/serving).

{serves 4}

DIY Gluten-Free Pizza Night

Over the past few years I have watched friend after friend turn gluten-free. Some have tested positive for Celiac Disease. Others simply feel better without gluten (a protein) in their system and likely have some degree of sensitivity or intolerance. I too have ventured down the less-bloated road devoid of bread, pasta and pancakes a time or two. Somehow I always find my way back to the (good) stuff–usually when they bring out the bread basket at a mussel bar.

image (1)

I’ve said it before and I’ll say it again, I’m a big believer in moderation. Many health experts, including  Dr. Alessio Fasano, Director of the Center for Celiac Research at the University of Maryland Medical Center, have concluded that gluten sensitivity exists on a spectrum. More anecdotally, I have experienced first-hand that by completely eliminating the protein from my diet I feel less sluggish, but the moment I slip the inflammatory and energy-zapping effects rebound with a vengeance.

image (2)

My suggestion? Eat everything in moderation (unless you have Celiac). Don’t eat pasta every night. Do eat quinoa–maybe even a few times a week. Be brave and try new grains–think amaranth, millet, buckwheat, etc. And, by all means, treat yourself to pizza every now and again–whether its the regular variety, or my homemade, gluten-free version below.

image

Gluten-Free Pizza Crust

Adapted from: www.glutenfreegirl.com

What You’ll Need:

  • 1 tbs ground flaxseed
  • 2 tbs boiling water
  • 1 cup brown rice flour
  • 1/2 cup garbanzo bean flour
  • 1/2 cup tapioca flour
  • 1 tsp turmeric
  • 2 tsp kosher salt
  • 4 tsp active-dry yeast
  • 1/4 cup olive oil (plus extra for brushing on top of the crust)
  • 3/4 cup warm water

How to Make It:

  1. Mix flaxseed in a bowl with 2 tbs boiling water. Whisk vigorously until it’s a thick paste. Set “slurry” aside to cool.
  2. Combine gluten-free flours, salt and turmeric (for color mainly) into the bowl of a stand mixer. Mix together.
  3. Pour yeast into a separate, small bowl with olive oil and 1/2 cup warm water. Stir and let stand a couple minutes to activate the yeast.
  4. Add slurry to dry ingredients in mixer and mix until combined. Pour yeast/oil/water into dry ingredients. Mix on medium for a minute, or until your dough starts to come together. If your dough is too dry, add remaining 1/4 cup of warm water in small amounts (or more if needed) until the dough feels workable. Remove from mixer, form into a ball and set  aside to rise for 1 hour–covering gently with a damp kitchen towel.
  5. Time to bake! Preheat oven to 450°. If you have a pizza stone or cast iron griddle pan (the smooth side), place it in the oven. If not, sprinkle a baking sheet with cornmeal.
  6. Generously dust a clean surface with cornmeal or gluten-free flour of choice. Roll out dough using a rollin pin dusted with gluten-free flour to your desired thickness (I went with super thin).
  7. To make individual size crusts and speed up the cooking process, use a large canister lid (approx. 6″ in diameter) to cut dough rounds. You may have to clump the scraps together into a ball and roll the dough out a few times to use it all up.
  8. Transfer dough rounds to pizza stone, smooth griddle or prepared tray. Brush the tops with olive oil. Bake until dough has started to crisp and brown around edges, about 4-6 min. Remove from oven. This is your pre-baked pizza crust.
  9. Top with tomato sauce or (my preference) mashed sweet potatoes and your favorite toppings (see suggestions below) and return to oven for another 4-5 min or until the cheese (if it’s on there) is melted.

Suggested Toppings to Please Any Crowd:

  1. Sauteed red onions
  2. Spinach
  3. Sauteed wild mushrooms
  4. Sauteed asparagus, zucchini or squash
  5. Super-thinly sliced eggplant rounds
  6. Roasted garlic
  7. Sun-dried tomatoes
  8. Goat cheese (or your cheese of choice)
  9. Sweet potato puree (literally just mashed, pre-cooked sweet potatoes) – great alternative to sauce!
  10. Prosciutto or small bits of pancetta
  11. Fresh basil
  12. Salt, pepper and a drizzle of good olive oil!

Zucchini “Fettuccine Alfredo” (Vegan) (Gluten-Free)

Growing up in a half-Italian household, there was no shortage of ricotta stuffed shells, eggplant parmesan, and creamy pasta dishes at family gatherings. You’d think I’d be naturally endowed with the ability to digest all that deliciousness. Sadly, like so many others, over the years I have lost the ability to properly digest lactose (a.k.a. I am dairy defunct). According to the NIH, “approximately 65% of the human population has a reduced ability to digest lactose after infancy.” So what’s an Italiana to do?

Thanks to creative cooks across the web and world, there are thousands of recipe alternatives out there for some of your favorite cheese and cream-heavy dishes. Ever since noshing on an amazing dish of dairy-free Fettuccine “Alfredo” in Austin, TX back in February I’ve been angling to make my own version that was both vegan and gluten-free. After reading countless recipes and making several attempts to fuse what I saw as the best elements of each, this is what I came up with…and it’s super tasty if I do say so myself!

Zucchini “Fettuccine Alfredo”

IMG_4359

What You’ll Need:

  • 1 cup raw cashews
  • 8 oz boiling water
  • 3-4 cloves garlic
  • 1/3 cup nutritional yeast
  • juice of half a lemon
  • 2 tbs olive oil
  • 1/4 tsp nutmeg
  • salt and pepper to taste
  • 4 small or 2 large zucchinis

How to Make It:

  1. Soak cashews in water overnight.
  2. Drain cashews and add to a blender or food processor. Add 8-oz of boiling water and blend until mostly smooth.
  3. Add remaining ingredients and blend until smooth and creamy.
  4. Adjust salt and pepper to taste. Let cool and store in the fridge for up to a week or use immediately (continuing to steps 5 and 6).
  5. Using a vegetable peeler, shave long slivers of raw zucchini into a bowl until you’ve used up the entire veggie. The strips should look like thin ribbons (see below).
  6. Toss zucchini with “Alfredo” sauce until well coated.
  7. Let marinate for at least 30 min so the sauce seeps into the “fettuccine.”

This can be served hot or cold. It makes for the perfect summer meal: very light, very healthy and, to top it off, very satisfying!

IMG_4363

Vegan Carrot & Sweet Potato Soup

Soups are normally a fall and winter staple in my diet, but having recently purchased a Vitamix I couldn’t help but try out one of my favorite recipes in my new toy. This recipe incorporates nutrient-dense carrots and sweet potatoes. These orange superstars contain alpha carotene, which protects against cancer, and beta carotene, which the body converts to vitamin A and helps prevent age-related macular degeneration. Almost all orange whole fruits and veggies may also have an anti-inflammatory effect, which is great news for all my runners and high-intesity athletes out there whose fitness takes a toll on their joints. Best of all, this recipe is incredibly easy to make and economical.

Vegan Carrot & Sweet Potato Soup

photo (2)

What You’ll Need:

  • 1 tbs coconut oil
  • 1 large sweet onion, chopped
  • 1 lb carrots, chopped
  • 1 large or 2 small sweet potatoes, chopped
  • 4 cloves garlic, minced
  • 1/2 tsp Jamaican All-Spice
  • 1/2 tsp Cinnamon
  • 1/4 tsp Nutmeg
  • 1/4 tsp Cayenne Pepper (double down if you like it spicy)
  • Salt & Pepper (to taste)
  • 1 carton (or 32 oz) organic vegetable stock (low sodium)

How to Make It:

  1. Heat oil in a large (5-6 qt) saucepan over medium heat. Add onions sautéing 5-7 min or until tender and translucent.
  2. Add garlic, all spice, cinnamon, nutmeg, cayenne and salt and pepper, cooking for another 2-3 min.
  3. Add sweet potatoes and carrot.
  4. Add vegetable stock, bring mixture to a boil, then reduce to a simmer for about 15 min. The potatoes and carrots should be easy to pierce and pick up with a fork but not falling apart.
  5. Finally, use a standing or hand blender to purée the mixture in your saucepan until smooth.
  6. Adjust your seasoning for spice and saltiness. Serve hot and enjoy!

I poured this mixture into canning jars making it an easily transportable lunch for the office. Pair it with a side salad or some roasted veggies for a delicious, gluten- and dairy-free midday meal.

Honey Ginger Carrots and Kale

Carrots and kale deliver a one-two nutritional punch packed with anti-inflammatory properties and potent antioxidants. Inflammation is at the root of much that harms and hurts us as we age, affecting everything from the skin and joints to  our cardiovascular health and risk of disease. Antioxidants are crucial internal warriors, fighting of damaging free radicals at the cellular level. Both veggies feature high concentrations of Vitamin A in the form of beta carotene, important for safeguarding those peepers, and Vitamin K, essential for bone health and blood clotting. Kale is also an excellent plant source of calcium, which is especially crucial for us ladies out there as we age.

This recipe makes for a great side dish to any meal. I served it alongside black rice cooked in green teach (antioxidant obsessed much?) and homemade, slow-cooker BBQ pork ribs.

Honey Ginger Carrots and Kale

IMG_3954

What You’ll Need:

  • 4 cups kale, chopped (thicker stems removed)
  • 2 cups baby carrots, sliced thin
  • 2 Tbs olive oil
  • 2 Tbs coconut oil
  • 2 1/2 Tbs raw honey
  • 1 Tbs fresh lemon juice
  • 1 inch fresh ginger, grated
  • 2 Tbs toasted sesame seeds

How to Make It:

  1. In a large skillet, melt oils with honey over low heat. Stir in grated ginger and lemon juice.
  2. Stir in carrots and toss to coat. Increase heat to medium and cook 5 min until heated through.
  3. Add kale and cook another 5-7 min, covered and stirring occasionally, until veggies are tender but still bright and al dente.
  4. Add sesame seeds and remove from heat. Serve immediately.

Soba Noodle Stir-Fry w/ Sirloin, Shiitake Mushrooms & Goji Berries

Goji berries are a Himalayan superfood used for 6,000 years by herbalists in China, Tibet and India to safeguard the liver, prevent macular degeneration, improve sexual function and fertility, boost the immune system, increase circulation, and promote a long and happy life. These lofty health claims are rooted in facts. These sweet/tart berries are rich in antioxidants, particularly the carotenoids beta-carotene and zeaxanthin. Zeaxanthin helps protect your eye’s retina by absorbing blue light and may decrease the risk of developing age-related macular degeneration (AMD), the leading cause of vision loss and blindness in people over 65.

Also  known as wolf berries, goji berries are my new favorite ingredient to add to salads (a great addition to my Sweet Sesame Raw Kale Salad), smoothies, and stir-frys. Speaking of, I recently tried them in a Soba Noodle Stir-Fry featuring sirloin strips, shiitake mushrooms, green swiss chard and carrots. They provided a delicious tangy, sweet surprise to an otherwise straight foreword stir-fry.

IMG_3515

What You’ll Need:

  • 6 oz buckwheat soba noodles
  • 1 tbs grapeseed oil
  • 1 cup green onions (thinly sliced)
  • 6 oz sirloin steak (cut into thin strips – against the grain)
  • 2 cups shiitake mushroom caps (sliced)
  • 2 garlic cloves (minced)
  • 2 cups green swiss chard (washed)
  • 2 tbs rice vinegar
  • 1 tbs fresh lime juice
  • 3 tbs low sodium soy sauce
  • 1 tbs peeled fresh ginger (grated)
  • 1 tbs Frank’s Red Hot sauce (or Sriracha)
  • 1 tbs sesame oil (separate from first)
  • 1/4 tsp salt
  • 2 tsps toasted sesame seeds

IMG_3518

How to Make It:

  1. Cook noodles according to package directions (no need for salt or oil here). Drain and rinse under cold water.
  2. Combine rice vinegar, lime juice, soy sauce, fresh ginger, and Frank’s Red Hot in a small bowl, stirring with a whisk. Set aside.
  3. Heat grapeseed oil in a large skillet over high heat. Add onions and stir-fry 1 min. Add carrots and stir-fry another 2 min. Add mushrooms and garlic, stir-fry 1 minute. Add swiss chard and stir-fry 2-3 min until greens wilt.
  4. Move veggies to the periphery of the pan. Season your sirloin strips with a little salt and pepper then add them to the center of the skillet. Cook for 2 min (sliced thin, your sirloin will cook fast over high heat so be careful not to overdo it).
  5.  Add vinegar mixture to steak mixture, cooking and stirring constantly for 1 min. Stir in noodles, sesame oil, and salt; cook for 1-2 min until noodles are thoroughly heated. Sprinkle with sesame seeds and serve immediately.

Food Allergy-Friendly Dinner Party

Times have changed and now it seems that almost everyone I know has a food allergy or sensitivity of sorts. Personally, I’m a card-carrying lactard. Despite my handicap, I’d still call myself a foodie – I just have to work harder on occasion! Due to my dietary shortcomings, all of the recipes on my blog are dairy-free, many are vegan, and from time-to-time they’re also gluten-free. The recipes below fall under all three categories and, as always, involve ingredients thoughtfully selected to boost your immune system and improve your overall health. Some of the nutritional rockstars in these recipes include:

Ginger: alleviates menstrual cramps; relieves an upset stomach; and has many other natural beauty and homeopathic applications

Coconut Milk: vitamins C, E and many of the metabolism-friendly Bs; magnesium, phosphorous, iron and potassium; may help combat heart disease and age-related diseases because of its high antioxidant content (for more info click here)

Garbanzo Bean Flour: see my post on Sweetly Salted Nut Butter Power Cookies

Turmeric: may prevent and slow the progression of Alzheimer’s disease, melanoma  and many other kinds of cancer; is a natural liver detoxifier (aka a hangover must); and may even play a role in fat metabolism. Need more convincing? Here’s a list of 20 benefits of this superspice.

THE MENU

Starter: Shaved Brussels Sprout Salad w/ Pine Nuts

Entrée: Red Lentil Coconut Soup with Shiitake Mushrooms and Spinach, served with Thyme-Infused Garbanzo Bean Flat Bread

Dessert: fresh seasonal fruit topped with shredded unsweetened coconut and dark chocolate bits

Wine Pairing: Vouvray or your favorite white wine

I wrote a blog on the first recipe earlier this week – click on the link above for details. As for the entrée, keep on reading.

**************

Red Lentil Coconut Soup with Shiitake Mushrooms and Spinach

 IMG_3333

What You’ll Need:

  • 2 cups red lentils, well washed
  • 1 tbs coconut oil
  • 1 onion, finely chopped
  • 4 garlic cloves, minced
  • 1 inch fresh ginger, grated
  • 2 tsp turmeric
  • 2 tsp cumin
  • 1 tsp sea salt
  • 1/2 tsp black pepper
  • 1/2 tsp cayenne pepper
  • 1 (28 ounce) can tomatoes w/ juice
  • 2 large carrots, peeled and chopped
  • 1 tbs fresh lemon juice
  • 6 cups vegetable broth
  • 1 (14 ounce) can light coconut milk
  • 2 cups shiitake mushrooms, thinly sliced
  • 1 shallot, minced
  • 1 tsp coconut oil
  • 1 bag spinach
  • 1/2 cup finely chopped green onions (to garnish)

How to Make It:

  1. In a large skillet, sauté onions in coconut oil until soft. Add garlic, turmeric, cumin, ginger, cayenne and salt and pepper. Cook, stirring for 1-2 min until aromatic. Add tomatoes with juice and bring to a boil, breaking up any large chunks as you stir.
  2. Add carrots, lentils, coconut milk and broth to your slow cooker. Spoon skillet mixture into slow cooker. Cover and cook on low for 6-8 hours. Stir in lemon juice and spinach leaves and continue cooking on high for last 20 min.
  3. Just after adding the spinach, in a medium skillet, sauté shallots in 1 tsp of coconut oil and a pinch of seas salt over medium heat for 3 min. Add shiitake mushrooms and cook for 2 min at medium heat then turn heat to low and cook another 8-10 min until tender and golden brown.
  4. Spoon soup into bowls and top with 1 tbs of thinly sliced green onions and 2 tbs of sautéed shiitake mushrooms.

Thyme-Infused Garbanzo Bean Flat Bread

IMG_3334

What You’ll Need:

  • 1 1/3 cups garbanzo bean flour
  • 1 1/2 tsp sea salt
  • 1 tbs dried thyme
  • 2 cups water
  • 2 tbs olive oil

How to Make It:

  1. In a large bowl, combine flour, salt and thyme. Slowly whisk in water. Let  mixture sit at room temperature for 30 min while oven pre-heats to 350 F.
  2. Place 9″ x 16″ cast iron griddle in oven while it heats. (You can also use a 10″ cast iron skillet here to make a more doughy version, akin to pizza crust).
  3. When batter is ready, whisk in 1 tbs of olive oil. Use the other 1 tbs to coat the griddle. Pour batter onto griddle and bake on center rack for 45 min to an hour (depending on the oven). The flatbread should be firm but chewy. Be careful not to burn. Carefully loosen flatbread from griddle with a spatula and let cool. Cut into strips and serve alongside your soup.

Finally, a great big thanks to my good friends and fellow yogis, Caroline and Jess, for being my test kitchen guinea pigs and great company!

IMG_3338

Great Grains: Farro & Leek Risotto

In our slim-obsessed society we often lump carbohydrates into one demonized category to be avoided at all costs. Carbophobes, listen up!! Not only are whole grains an excellent source of vitamin E, they’re crucial to your metabolism because they’re rich in B-complex vitamins. They’re also packed full of dietary fiber–a.k.a. your best ally against over-eating and weight gain.

So how can you work these great grains into your diet? How about a delicious whole grain risotto recipe using farro and featuring another dietary supastar–leeks!

photo (2)

Leeks are a great source of Vitamin A. In fact, one serving contains up to 1/3 of your daily recommended value. As a member of the onion family they are a great source of allicin, which has proven anti-fungal and antibacterial properties–part of what gives these green tubers prebiotic properties. Prebiotics have been proven to alleviate symptoms of IBS and may reduce the risk of certain kinds of cancer.

photo (3)

What You’ll Need:

  • 6 cups low-sodium vegetable or chicken stock
  • 2 tablespoons extra virgin olive oil
  • 1 red onion, diced
  • 3 leeks, white and light green parts only, rinsed thoroughly and sliced into rings
  • 3-4 garlic cloves, minced
  • 1 cup Arborio rice
  • 1/2 cup dry white wine
  • 2 cups cooked farro (3/4 cup uncooked)
  • 1 cup fresh parsley, coarsely chopped
  • Salt & pepper to taste
  • 2 tbs fresh lemon juice

How to Make It:

  1. Bring stock to a simmer in a medium saucepan over low heat.
  2. Heat olive oil over medium heat in a large, heavy saucepan. Add diced onion and a pinch of salt, sautéing for 3-4 min. Then add leeks and sauté another 2-3 min. Once onions and leeks begin to soften, add garlic and Arborio rice. Cook about 3 min, or until rice begins to crackle.
  3. Pour in wine and cook over medium heat, stirring constantly, until the wine has almost completely disappeared. Stir in one ladleful of simmering stock. The stock should bubble not boil. Cook, stirring often, until it’s almost absorbed. Add another ladleful and continue cooking like this (adding more liquid when the rice is almost dry) until you’ve used up most of your stock and the rice is al dente.
  4. Stir in the pre-cooked farro (make it according to the directions on the package), parsley  fresh lemon juice, and salt and pepper to taste. and herbs. Add another ladleful of stock and continue to cook for a minute, then a remove from the heat.
  5. The risotto should be creamy but not runny. If it’s dry, add a little stock.

Making this will be a labor of love. You’re constantly ladling and stirring, so grab a glass of wine and don’t drift too far from the stove. It’ll be worth it, I promise!

Sunday Spread: BBQ Pulled Chicken w/ Asian Broccoli Slaw & Kale Chips

A couple of weeks ago, I wrote about my Jerk Chicken Sunday Spread. Well with NFL playoff season in full swing–GO PATS!–I decided y’all might enjoy another modified comfort food recipe, and one that will keep your guests happy and healthy. This Sunday Spread is tailgate-inspired with its sandwich, slaw and chip combo. The recipes are nutrient-dense and tasty as can be…leaving a little wiggle room for some of my signature perfect Manhattans (*insert devilish grin here*).

For starters, homemade BBQ sauce is the way to go. Not only do you know exactly what you’re eating and avoid a lot of preservatives, but you also get to control the acidity, sweetness and spice levels. At 32 g of lean protein per serving, the chicken in these sammys gives you a good dose of your recommended dietary allowance (RDA) of protein–which for adult women is 46 g and adult men 56 g. Cruciferous vegetables like the broccoli and kale used in these side dishes are packed with disease-fighting nutrients, including several carotenoids, vitamins C, E, and K, folate, and dietary fiber.

Get to cookin’ and enjoy this football-friendly Sunday spread, guilt-free!

IMG_2786

SLOW-COOKER BBQ PULLED CHICKEN

What You’ll Need:

  • 2 lbs chicken (about 4 chicken breasts or 5 chicken thighs)
  • 1 white onion, diced
  • 4 cloves garlic, minced
  • 3/4 cup all-natural ketchup
  • 1/4 cup sun-dried tomato paste
  • 1/4 cup apple cider vinegar
  • 2 tbs chili powder
  • 1 tbs brown sugar
  • 1 tbs Worcestershire sauce
  • 1 tsp dry mustard
  • 1 tsp smoked paprika
  • 1 tsp cumin
  • 1/4 tsp allspice
  • 1/4 tsp cinnamon
  • 6 whole wheat sandwich rolls

How to Make It:

  1.  Grab a mix bowl and combine the garlic, ketchup, tomato paste, vinegar, brown sugar, Worcestershire sauce, mustard, paprika, cumin, allspice and cinnamon. Give it a good whisk until smooth and well blended.
  2. Add your chicken breasts or thighs in a single layer at the bottom of your slow cooker. Sprinkle the diced onions evenly overtop. Pour your BBQ sauce mixture on top, cover and set heat to low. Let cook for 4-5 hours like this.
  3. Remove chicken from slow cooker. The chicken should be pretty much cooked-through, but now it’s time to shred. Using two forks, gently pull apart the chicken into stringy pieces and/or small chunks. Once you’ve shredded the lot, add it back to the sauce in your slow cooker and cook another 1-2 hours.

ASIAN BROCCOLI SLAW

What You’ll Need:

  • 1 package pre-shredded broccoli slaw mix (your could use the cole slaw mix here as a substitute or shred your own cabbage and carrots)
  • 2 tbs green onions, sliced thin
  • 2 tbs fresh cilantro, minced

For the dressing:

  • 2 tbs sesame oil
  • 2 tbs low sodium soy sauce
  • 2 tbs honey
  • 1 tbs rice vinegar
  • 1 tbs lemon juice
  • 1 tbs fresh ginger, grated

How to Make It:

  1.  Whisk all dressing ingredients together in a large mixing bowl. Add slaw mix, green onions and cilantro. Toss together until well-coated and combined. Cover and refrigerate for at least 1 hour before serving.

BBQ-INSPIRED KALE CHIPS

What You’ll Need:

  •  1 head kale (whatever variety you like best)
  • 3 tbs olive oil
  • 1 tsp dry mustard
  • 1 tsp chili powder
  • 1/2 tsp smoked paprika
  • 1/2 tsp cumin
  • 1/2 tsp allspice
  • salt and pepper, to taste

How to Make Them:

  1. Pre-heat over to 300°F. Wash, stem and cut kale into bite size pieces.
  2. Toss kale and olive oil together in a large mixing bowl. Sprinkle spices as evenly as possible over the kale then mix thoroughly with your hands, massaging the kale, for 1-2 min. 
  3. Place wire cooling racks on two cookie sheets. Spread coated kale leaves over both wire racks. (Note: the wire cooling racks allow heat to crisp the kale from top and bottom. Without this added elevation your chips will be soggy and oily.) Bake for 20-30 min depending on the oven. Keep an eye on them for the last 10 min or so to ensure they don’t burn.
  4. Remove from oven, flake them into a bowl and enjoy!