Spicy Mango-Coconut Popsicles

We live in a world addicted to sugar, it’s true, but going cold turkey doesn’t always work out so well. Deprivation can lead to yo-yo eating patterns, which won’t help you sustain your long-term healthy eating goals. A better approach that I often help my wellness clients take is making healthier versions of your favorite meals.

Dessert, while not the most essential of meals, is nonetheless an important food ritual many of us enjoy – and hey, life is best when enjoyed! One of my favorite challenges is finding ways to make sweets better for you without tasting like sawdust or bland ice.

IMG_6433 2

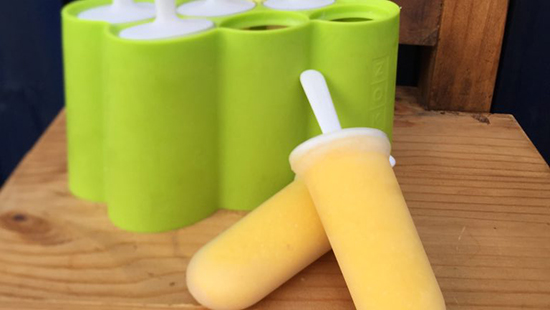
With that in mind, I recently experimented with  a Mango Coconut Popsicle recipe, spiced with ginger. Ginger is a superfood linked to relieving nausea, inflammation, pain and a whole host of digestive issues. I also threw some turmeric in there because, well, why not? It too has anti-inflammatory properties and might help your skin and joints look and feel their best.

This fast and tasty recipe is guilt-free and impossible to mess up. Bonus: any leftovers that won’t fit in your molds can be enjoyed on the spot as a healthy smoothie. Enjoy!

IMG_6431 2


Spicy Mango-Coconut Popsicles

Servings: 6-8 popsicles


Ingredients:

  • 1 1/2 cups frozen mango
  • 1/2 very ripe banana
  • 1” fresh ginger, peeled
  • 1/2” fresh turmeric, scrubbed
  • 1/2 cup whole fat plain yogurt
  • 1/3 cup toasted coconut flakes
  • 8 oz unsweetened almond milk


Directions:

  1. Blend ingredients in a high-speed blender for 1 minute or until smooth.
  2. Pour into popsicle molds leaving about a 1/4” at the top. Any leftovers can be consumed like a smoothie – yum!
  3. Freeze for at least 3 hours, but ideally overnight.

Blood Orange and Ginger Sorbet

Much as I’ve loved this late and lurid winter we’re having in DC, I’m off to warmer weather. In an attempt to transport you to the places where people wear shorts and sip margaritas beachside this time of year, I thought I’d share with you a recipe for a refreshing sorbet. Personally, I’d eat this regardless of freezing temperatures so long as there’s a bathrobe and space heater nearby, am I right?!

While you might not be ready for this chilly concoction just yet, you should definitely bookmark the recipe or print it because blood oranges and ginger are two superfoods you don’t want to miss out on. Blood oranges are high in vitamin C, potassium, dietary fiber, carotenoids, and polyphenols like your standard oranges, and also have the added benefit of anthocyanins–powerful antioxidants which fight disease and inflammation. Ginger, one of my all-time favorite superfoods, is widely used to treat nausea, flatulence,stomach upset, and morning sickness. Ginger has also been linked to relieving the symptoms of upper respiratory tract infections, bronchitis, coughs, menstrual cramps, arthritis, and muscle pain. This super-root is as close to a homeopathic panacea as I’ve seen.

MOARfit by Amy RIzzotto | Blood Orange and Ginger Sorbet

Blood Orange and Ginger Sorbet

Ingredients:

  • 4 pounds blood oranges or other oranges
  • 1 1/4 cups water
  • 3/4 cup sugar
  • 1 ½ Tbs orange zest
  • 1 Tbs grated ginger
  • Juice of one Meyer lemon

Directions:

  1. Finely grate the zest of two oranges, 1 lemon, and about 1½” of peeled, fresh ginger root.
  2. Combine 1 1/4 cups water, sugar, zest and ginger in heavy medium saucepan. Stir over high heat until sugar dissolves and syrup boils; remove syrup from heat to cool.
  3. Peel oranges and remove all pith, strings, and seeds. Transfer oranges and lemon juice to a blender or food processor; puree until smooth, about 30 seconds. Measure 4 cups orange puree and mix into orange-lemon-ginger syrup (reserve any remaining puree for another use—hello bold an beautiful smoothies!).
  4. Cover orange mixture and refrigerate for at least 6 hours and up to 1 day to blend flavors.
  5. Process orange mixture in ice cream maker according to manufacturer’s instructions. Transfer to a container, cover, and freeze.
  6. Eat within a week for best results.

Chocolate Zucchini Bread (gluten-free)

A little bit of chocolate goes a long way. Am I right birthday girl (shout out to my sweet mama on her birthday!!)?

Chocolate Chips via www.moar-fit.com

A lotta bit of zucchini plus a little bit of chocolate makes for one heck of a tasty/healthy gluten-free bread intended for breakfast but worthy of dessert status.

Chocolate and Zucchini via www.moar-fit.com

The nutrient-dense additions and ingredient swaps I’ve made to this Chocolate Zucchini Bread means you’re in charge of when you want to eat it–morning, noon or night–sans guilt!

Zucchini via www.moar-fit.com

Zucchini is a great seasonal food this time of year and it’s mild sweetness and high water content ensure this bread will melt in your mouth.

MOARfit Chocolate Zucchini Bread

Though I’m a huge flavor skeptic when it comes to gluten-free desserts, this healthy treat delivers with a big chocolate nose and no beany or chalky finish (yes, I used wine terminology right there).

MOARfit Chocolate Zucchini Bread with nectarines

Tip: I like to double up on the recipe and freeze one loaf. It’s a great thing to have on hand when friends and family come to town!

MOARfit Chocolate Zucchini Bread Loaf

Chocolate Zucchini Bread

{makes one loaf, 12 servings}

Adapted from The Joy of Baking.

What You’ll Need:

  • 1 cup gluten-free flour (I used Bob’s Red Mill mix)
  • 1/2 cup unsweetened cocoa powder
  • 1/2 tsp salt
  • 1 tsp baking soda
  • 1/2 tsp baking powder
  • 1 tsp cinnamon
  • 1/2 tsp ground ginger
  • 1/4 tsp nutmeg
  • 1/4 tsp ground cloves
  • 1 banana
  • 1/2 cup canola oil
  • 2 eggs
  • 1/2 cup coconut palm sugar
  • 1 tsp vanilla extract
  • 1 medium zucchini shredded
  • 1/4 cup dark chocolate or carob chips (optional)
  • 1/4 cup dried, tart cherries, chopped (optional)
  • 1/4 cup slivered almonds (optional)

How to Make It:

  1. Preheat oven to 350 F placing a rack in the center. Grease or spray a 9″ long loaf pan and set aside.
  2. Grate the zucchini, using a medium sized grater. Set aside.
  3. In a large bowl whisk together the gluten-free flour, cocoa powder, baking soda, baking powder, salt, ground cinnamon, nutmeg, ginger and cloves.
  4. In another large bowl or standing mixer, whisk the eggs, oil, sugar, banana and vanilla extract until well blended.
  5. Fold in the flour mixture. Then fold in the grated zucchini. Stir in the chocolate chips, cherry pieces and slivered almonds (remember, all are optional!).
  6. Scrape the batter into the prepared pan and bake until the bread has risen and a toothpick inserted in the center comes out clean (approx. 45 min). Place on a wire rack to cool for about 10 minutes, then remove the bread from the pan and cool completely.

This bread can be stored at room temperature for several days, in the fridge for up to 10, or it can be frozen.